
- Details
- Category: Photography Blog
 One of the pieces of equipment that almost always goes with me is my classic Gorrillapod. The times it doesn't go with me usually end in a ARGHH!!. Sometimes I think that I won't need it and it behind and then I'll find myself eating at a new restaurant wanting to take photos of my food and I'll have no tripod. I have to then resort to using a flash that blows out the photos and makes everyone in the joint blink frantically for about 5 minutes while trying to get their eyes to discerne contrast. The classic Gorillapod weighs only 2 oz so you barely notice you have it and will hold most point and shoot cameras (the Canon G7 is a bit overweight but it still works). For larger cameras Joby has come out with larger Gorillapods. The Gorillapod SLR holds 1.75 lbs, the SLR Zoom is larger still and holds up to 6.6lbs!
If however, the SLR zoom doesn't do what you want it to do and your aim is to have your tripod double as a jackstand in the garage they've released the new Gorillapod Focus. First of all they fail miserably with the name. The others make sense, SLR (bigger than point and shoot), SLR Zoom (for large lenses, bigger still) but the Focus does nothing for me. I immediately think of Ford Focus which is a small car. I think a naming scheme along the lines of small, medium, large and giant would have worked better. Anyway the Focus can hold up to 11lbs and the legs are made of metal segments and only weighs 1.1 lbs. This I think is a pretty cool thing considering you get a foot tall tripod that can be set up on uneven surfaces and it's still fairly lightweight. It has a mount for 1/4 camera as well as an adapter screw for 3/8" tripod heads so you could put a panorama head (or any other for that matter) on it easily enough.
I hope they sell extra adapter screws because I know I'd lose them in a heartbeat.
Along the same lines they've added a few other things since I've checked on them. They offer spike feet for the Gorillapod SLR to stick into soft soil (or giant marshmallows I suppose) and the Gorillapod Go-Go which unfortunately has very little if anything to do with girls dancing around a pole. The Go-Go has suction or sticky mounts so it can stick to anything giving you the convenience of mounting your PSP or GPS device using a Gorillapod.
- Details
- Category: Site News
Grantmcwilliams.com com was down for the last day because of a Gb-E network switch that decided to stop passing any traffic without any warning at all. It was probably find because someone hacked my Joomla template and inserted a greeting card submit form at the top of every page. An update to the latest Joomla 1.5.7 resolved that and taking the switch out of commision solved the other part.
Anyway, things are back to normal now.
- Details
- Category: VirtualBox Howtos
There are a lot of problems with the new VirtualBox 2 series. I've found many things don't work as they're supposed, I get lockups for no reason and the new features just don't warrent a full version increase. I've rolled back all my projects at work to VirtualBox 1.6.6 and decided in non-mission critical situations (home use) I'd continue using VirtualBox 2.02 and just deal with the bugs. Well, I'm officially back-pedaling on that now. VBox 2 is buggy as heck and I'm not going to continue using it.
In order to downgrade your VMs from 2.x to 1.6.6 you'll need to edit a few xml files. If you had 1.x installed and upgraded to 2.x then it will have molested your xml files so you'll need to edit them. For each VM there is an xml file in the Machines directory containing the configuration data.
/home/grant/.VirtualBox/Machines/Linux Mint/Linux Mint.xml
<HardwareVirtExNestedPaging enabled="false"/>
<GuestProperties>
<GuestProperty name="/VirtualBox/GuestAdd/Vbgl/Video/SavedMode" value="1280x960x32" timestamp="1224693483507107000" flags=""/>
</GuestProperties>
- Details
- Category: Photography Blog
 If you are like me and rely on DPreview to decide on which camera to purchase then it's imperative that they review cameras that I'd want to purchase. I'm sure that it's not exciting for the reviewers to review yet another camera that doesn't do anything put take pictures when you push the "shutter" button but some of us use those cameras and rely on DPreviews. The reason I'm writing this post is because it appears that although there have been quite a few really big Point and Shoot releases (Nikon P6000, Panasonic LX-03 and Canon G10 most recently) there haven't been any reviews in 6 months. As a matter of fact there are been very few non DSLR reviews for the 2008 year. To the right I've grabbed an image of all the cameras reviewed by DPreviews in chronological order so you can see for yourself.
Like I said maybe reviewing Point and Shoot cameras are the photography equivalent to being the muffler guy at the Indy 500 or the water boy for the leading NFL team but still it's an important service that is appreciated by the long time fans of DPreview.
Another problem might be that companies like to release new Point and Shoot cameras with exactly the same specs as the last model. My new Canon SD870 has the same resolution, almost identical case and nearly the same lens as my old SD500 but I'd still like to see how it fares as compared to the competition. I've noticed some barrel distortion in the lens that sometimes seems excessive and it would be nice to have a professional opinion on it. Maybe there was a better choice in the compact wide angle category that I should have bought instead.
- Details
- Category: Travel Blog
So lets get this out of the way right now, I don't like buses. I don't like them in America, I don't like them in Croatia and I don't like them in Germany. I don't like them sam I am! The one exception to that is buses in Mexico which are quite nice if you get Deluxe class or Business class. I'd even rather ride a first class bus in Mexico over any other bus I've ridden. The classes go First, Deluxe and the nicest is Business just in case you don't know. So why am I posting about buses? Because in lieu of great train or airline service in the US new bus companies are popping up. It takes roughly 4 hrs to go from downtown NY to downtown DC on a bus. It takes about the same time or more to get to JFK, go through security, board a plane, fly, leave Washington Dulles and take a taxi to the city center of DC. Here's the kicker, the bus costs as low as $1! No matter what happens in the airline world there will never be a sustainable flight from NY to DC for $1. 
So I found two companies doing this - Boltbus and DC2NY. I checked prices and Boltbus came in at $10-$20 and DC2NY the "upscale" bus company came in at $28 one way. There was a slight discount for a return ticket ($50 both ways). Both companies offer free onboard wifi internet access. So not only do you not have to go through security, you don't have to stand in line to get on the plane, you don't have to take a taxi and you don't have to be bored for the 4 hours. I didn't think I'd ever say this but buses may be the best way to get between NY and DC.
I just checked the Amtrak website and the train takes the same amount of time but costs $144 a person. Jet Blue charges $147 and with getting to the airport 30 minutes before flying and getting away would take almost exactly 4 hrs.
To recap I used the same days and similar times for the two bus companies, Amtrak and Jet Blue.
New York to DC, round trip
| Bolt Bus | $20 | 4hr 30min | wifi, power outlets, reserved seats |
| DC2NY | $46 | 4hr 30min | wifi, no power outlets, no reserved seats |
| Megabus | $16 | 4hr 30min | n/a |
| TonyCoach | $30 | 4hr 30min | Uses gotobus.com for cart |
| Todays | $35 | 4hr 30min | Uses gotobus.com for cart |
| Eastern | $36.75 | 4hr 30min | Uses gotobus.com for cart, free wifi |
| Amtrak Ascela | $322 | 2hr 45min | |
| Amtrak | $144 | 3hr 20min | |
| Greyhound | $75 | 4hr 30min | Found promotion for $40 though |
| Jet Blue | $147 | 1hr 20min | Taxi/Train to and from airport and going through security - 4hr travel time |
Bolt bus seems to be the winner. They have power plugs (DC2NY doesn't) 3 extra inches of legroom, wifi and a loyalty program. After 4 trips you get the fifth free. This seem like an incredibly cheap way of going between these cities. Bolt Bus also has service to Boston and Philly now.
It looks like the fastest way to get from downtown New York to downtown DC is by Amtrak Ascela which takes just under 3 hrs. Amazingly so that train can do 150 mph but is limited by the states it goes through it averages 75 mph. Go America... You can take the standard Amtrak train and it only takes 35 minutes longer and you saved yourself a couple hundred dollars. Add another hour to your journey and you saved another $100.
- Details
- Category: Photography Blog
I've been wanting to start geo-tagging photos so I could link gallerys into google maps so users browsing my site could view a map of where the photos were taken.  There are devices that record geographical points and then there is software that can take the file they create and look through a directory of photos and match up the timestamps to tag the photos. This is nice but not quite as easy as some would like.
I found an interesting device that allows you to geo-tag without using a computer at all. This would be good for straight uploading to flickre or other photo sites. Combined with an Eye-Fi you might be able to take photos, tag them and upload them without ever getting close to a computer at all!
From the ATP Electronics site
ATP GPS PhotoFinder™ mini adds geotag data to your digital images, no complicated software required!
Simply turn the device on while you're taking pictures, and insert your card into the enclosed memory card slot on the docking station and it will automatically do the geotagging for you!
h4ck3d by L07hDh "stop the war" h4ck3d by L07hDh "stop the war" h4ck3d by L07hDh "stop the war"
Go to ATP Electronics website for more info. The device shown is the GPS Photofinder mini. The mini has the separate dock (card reader) so the GPS recorder is smaller. They also have the GPS Photofinder which includes the card reader in the device. It's gotten mixed reviews but the idea is neat. For those with a computer it's probably better to get a datalogger and do the tagging with computer software.
- Details
- Category: Xen Howtos
1. First we need to download the YUM repository file for the updated Xen.
wget http://www.gitco.de/linux/x86_64/centos/5/CentOS-GITCO.repo -O /etc/yum.repos.d/gitco.repo
2. Uninstall old Virtualization files
yum groupremove Virtualization
3. Install the relevant packages using YUM
yum groupinstall -y Virtualization
Yum will probably want to upgrade some other files along with the ones we've chosen.
Warning! If you get an error message from grubby this is bad!
Installing: kernel-xen ####################### [ 9/13]
grubby fatal error: unable to find a suitable template
This means that your grub.conf file couldn't be written to for whaterver reason so you won't be able to successfully reboot. If you get this message you need to edit your /boot/grub/grub.conf file and make the kernel lines match the kernel you installed.
Get your installed kernel version:
[ root@vs / ] rpm -q kernel-xen
kernel-xen-2.6.18-128.4.1.el5
Now edit your /boot/grub/grub.conf to match this
# grub.conf generated by anaconda
#
# Note that you do not have to rerun grub after making changes to this file
# NOTICE: You have a /boot partition. This means that
# all kernel and initrd paths are relative to /boot/, eg.
# root (hd0,0)
# kernel /vmlinuz-version ro root=/dev/vgsys/lvroot
# initrd /initrd-version.img
#boot=/dev/sda
default=0
timeout=5
splashimage=(hd0,0)/grub/splash.xpm.gz
hiddenmenu
title CentOS (2.6.18-128.4.1.el5xen)
root (hd0,0)
kernel /xen.gz-3.4.0
module /vmlinuz-2.6.18-128.4.1.el5xen ro root=/dev/vgsys/lvroot rhgb quiet
module /initrd-2.6.18-128.4.1.el5xen.img
4. Reboot - no really I mean it.
5. Try it out by using the xm dmesg command
\ \/ /___ _ __ |___ / |___ / / _ \
\ // _ \ '_ \ |_ \ |_ \| | | |
/ \ __/ | | | ___) | ___) | |_| |
/_/\_\___|_| |_| |____(_)____(_)___/
(XEN) Xen version 3.3.0 (
(XEN) Latest ChangeSet: unavailable
(XEN) Command line:
(XEN) Video information:
(XEN) VGA is text mode 80x25, font 8x16
(XEN) VBE/DDC methods: V2; EDID transfer time: 2 seconds
(XEN) Disc information:
(XEN) Found 1 MBR signatures
(XEN) Found 1 EDD information structures
(XEN) Xen-e820 RAM map:
That's about all. If you have any questions drop a comment here.
- Details
- Category: Photography Blog
I probably sound like a broken record here but companies keep releasing cameras in my range but I don't have enough information to actually purchase one.The camera that I'm trying to replace is a Canon G7 which is currently broken. I can get it fixed for about $135.00 but advances have been made since I got it. Nikon and Panasonic have both come out with replacements to their sub-SLR level cameras. The Canon P5100 was so pathetically slow that it knocked itself out of the running even though the specs and the photos were excellent. I've not seen a review on the P6000 yet to know if they fixed that issue. The Panasonic Lumix DMC-LX1 and LX2 made photos that resembled Degas paintings at ISOs greater than 200 so they were out even though they had great specs. Now here we are with a new Canon G series camera. I've put together a chart below (ripped from dpreviews comparison page) of the three contenders. Below the chart I'll outline the pluses and minuses as I see them.
| Nikon Coolpix P6000 | Panasonic Lumix DMC-LX3 | Canon Powershot G10 | |
| Image |  |
 |
 |
| Price (street) |
$499.97
|
$485.30
|
$499.00 |
| 4224 x 3168 | 3648 x 2736 | 4416 x 3312 | |
| 13.5 million | 10.1 million | 14.7 million | |
| 13.93 million | 11.3 million | Unknown | |
| 1/1.72" (7.40 x 5.55 mm, 0.41 cm²) | 1/1.63 " | 1/1.7 " (7.60 x 5.70 mm, 0.43 cm²) | |
| 33 MP/cm² | 24 MP/cm² | 34 MP/cm² | |
| Auto (64 - 800), Hi-Auto (64 - 1600), 64, 100, 200, 400, 800, 1600, (3200, 6400 at 3MP) | Auto, Hi Auto (1600-6400), 80, 100, 200, 400, 800, 1600, 3200 | Auto, 80 ,100, 200, 400, 800, 1600 | |
| 28 mm | 24 mm | 28 mm | |
| 112 mm (4 x) | 60 mm (2.5 x) | 140 mm (5 x) | |
| Yes | Yes, Lens | Yes, Lens | |
| Yes | Yes | Yes | |
| 2 cm | 1 cm | 1 cm | |
| F2.7 - F5.9 | F2.0 - F2.8 | F2.8 - F4.5 | |
| Unknown | 60 sec | 15 sec | |
| Unknown | 1/2000 sec | 1/4000 sec | |
| Built-in Flash | Yes | Yes, pop-up | Yes |
| Flash guide no. | 8.0 m (26.2 ft) | 8.3 m (27.2 ft) (Auto ISO) | 4.6 m (15 ft) |
| External flash | Yes, hot shoe | Yes | Yes |
| Flash modes | Auto, Fill-in, Red-Eye reduction, Slow, Off | Auto, Red-Eye Auto, On, Red-Eye On, Red-Eye Slow Sync, Off, | Auto, Fill-in, Red-Eye reduction, Slow Sync, Off |
| Unknown | Multi-segment, Center-weighted, Spot | Evaluative, Center Weighted, Spot | |
| Yes | Yes | Yes | |
| Yes | Yes | Yes | |
| Lens thread | Yes | Yes, optional adapter | No |
| Yes | Yes, 2.5 fps, max 8 images | Yes, 0.7 fps | |
| Movie Clips | Yes, 640 x 480, 15/30 fps, 320 x 240, 15 fps, 160 x 120, 15 fps | Yes, 1280 x 720 @ 24 fps, 848 x 480, 640 x 480, 320 x 240 @ 30fps, 320 x 240 @ 10fps | Yes, 640 x 480 @ 30 fps, 320 x 240 @ 30 fps, 160 x 120 @ 15 fps |
| Self-timer | 3 or 10 sec | 2 or 10 sec | 2 or 10 sec or custom |
| Orientation sensor | No | Yes | Yes |
| Yes | RAW | RAW | |
| Yes | No | Optical | |
| 2.7 " | 3.0 " | 3.0 " | |
| 230,000 | 460,000 | 461,000 | |
| Yes | Yes | ||
| Weight (inc. batteries) | 280 g (9.9 oz) | 265 g (9.3 oz) | 390 g (13.8 oz) |
| Dimensions | 107 x 65.2 x 42 mm (4.2 x 2.6 x 1.7 in) | 109 x 60 x 27 mm (4.3 x 2.4 x 1.1 in) | 109 x 78 x 46 mm (4.3 x 3.1 x 1.8 in) |
I can honestly say that I only had a few complaints about the Canon G7 - it was heavy and a bit bigger than I wanted and it didn't have a built in wide angle lens. I bought the external wide angle and rarely used it because it was huge.
- Details
- Category: Paris/Lyon - 2008
 I've cut down the number of photos in the Paris/Lyon gallery by half. There were about 1300 there and now I think there's 664 or so. I also added a module so I can have my youtube videos embedded in the gallery so you don't have to check both places for videos. All photos should be rotated so you don't have to get neck cramps and there shouldn't be too many duplicates. I've not edited very many as I don't have time but there are some that I've cropped, rotated or cleaned up a bit, mainly food photos.
Now to complete the travel journal...
Grant
- Details
- Category: Food Blog
When I'm in Paris I eat croissants, baguettes and escargot. As soon as my plane lands I eat a Philly Cheesteak or a Cheeseburger. How much more American can you get? When in America do what the Americans do. In this same vein I'm tring to learn to BBQ. This may sound silly as anyone can light a fire and throw meat on it right? I know how good BBQ can be but I rarely get to experience it because what happens is I go to someones house and they throw some ribs on the grill and you spend the rest of the night trying to get the meat off them and finally give the job over to the dog who has no better luck.
This is NOT what I'm talking about. I'm trying to learn to do it right. Take one cut of meat and cook it until I've mastered it and then move on to the next. Once I have a cut of meat down I can then justify buying Prime or Choice but until then it's Select for me. I've found a couple of sites that seem to be pretty good in helping the helpless BBQ and I've added them to the Food links.

 People who use store bought Matchlite quicklite charcoal and douse it with lighter fluid are not quite who these sites are aimed at. Lump charcoal (with no added fuel) is about the best but not all is created equal. The first site reviews lump charcoal for temp, burn time and ash buildup. As soon as I find one of the reviewed brands locally I'll post a note. The other two sites are about all things BBQ. They have reviews of smokers and grills.
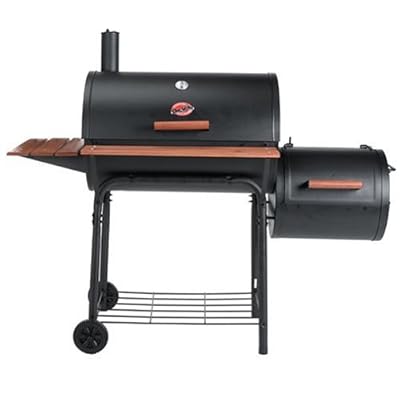
I will probably be buying the Weber Smokey Mountain smoker and the Char-Griller grill because of reviews on both sites. I'll have modifications to the Char-Griller to do which are also outlined. Because I plan on getting the WSM I may change my choice of the Char-Griller to something else without a smoker attachement if it means a better grill. I'm not sure, I'll let you know later.
Grant
Page 39 of 56